
Additionally, You can also like and, follow us on Pinterest, and Reddit for more updates. Your thoughts and engagement are greatly appreciated!
Yard House Crispy Brussels Sprouts Recipe
• June 25, 2025
•
2 Comments
When it comes to Brussels sprouts, pan-searing them in a blazing hot cast-iron skillet might just be the most transformative technique in your kitchen arsenal.
This method delivers Brussels sprouts that are crispy and caramelized on the outside, creamy on the inside, and packed with deep, nutty flavor.
It’s the kind of dish that makes people say, “Wait-these are Brussels sprouts?” This isn’t just a side dish-it’s a full-blown flavor event, just like the Saltgrass Steakhouse Brussel Sprouts.
What Does Yard House Crispy Brussels Sprouts Taste Like?
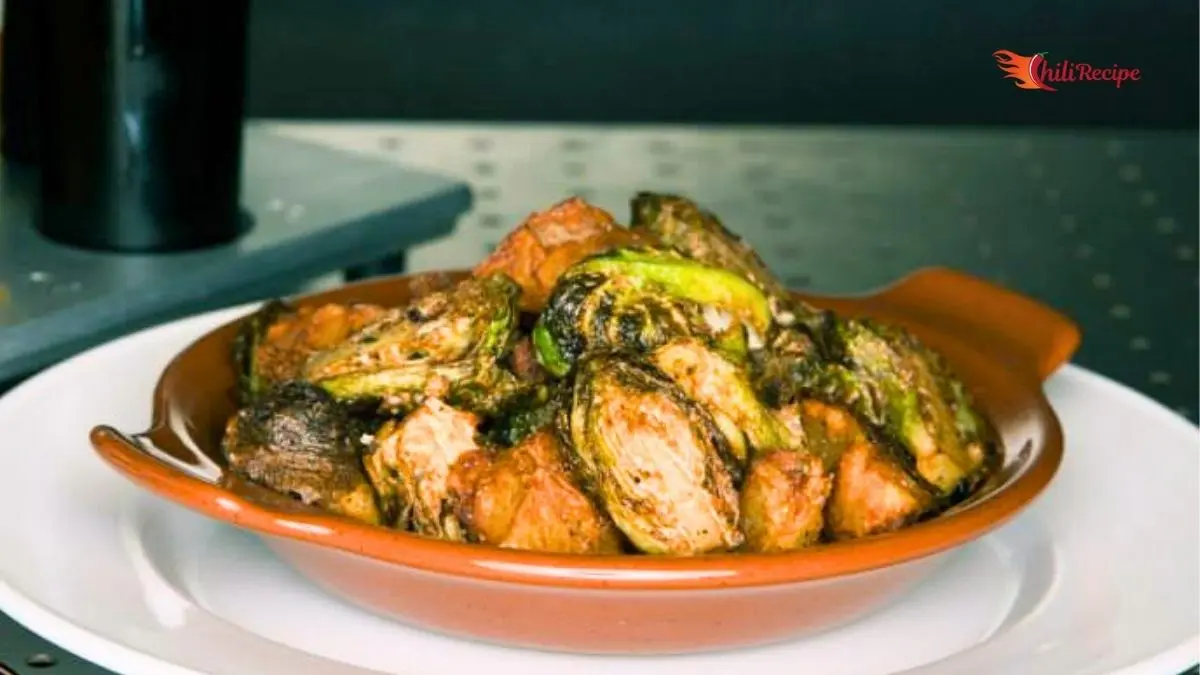
Yard House Crispy Brussels Sprouts are savory, nutty, and perfectly caramelized. The outer leaves are golden and crunchy, while the inside stays tender and creamy.
They’re lightly seasoned, often with a hint of sweetness and tang from toppings like balsamic glaze or cranberries, making each bite balanced and irresistibly flavorful.
Ingredients Required for Yard House Crispy Brussels Sprouts Recipe
Here’s the list of Ingredients you’ll need to make this Yard House Crispy Brussels Sprouts
- 8 oz Brussels sprouts (fresh from the stalk if you can-bonus points for flavor and freshness)
- 2 tablespoons ghee, or substitute with avocado oil or grapeseed oil
- Kosher salt, to taste
- Fresh cracked black pepper, to taste
- Fresh parsley, chopped (optional garnish)
Kitchen Utensil You’ll Need
- Cast-iron skillet (nonstick works too, but cast iron = better sear)
- Sharp knife
- Cutting board
- Mixing bowl
- Splatter guard (highly recommended!)
- Tongs or chef’s tweezers (optional but handy for flipping)
Prep Time: 10 minutes
Cook Time: 10 minutes
How to Make Yard House Crispy Brussels Sprouts
Simply follow the steps given below to make your Yard House Crispy Brussels Sprouts at home
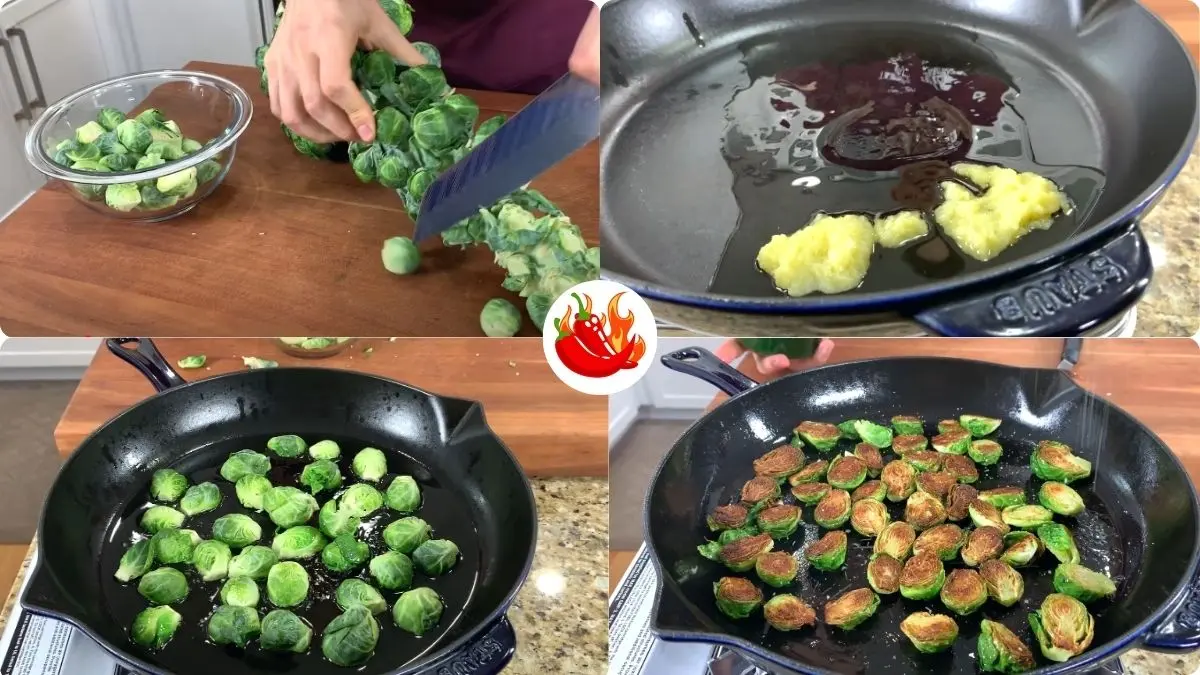
1. Trim & Halve the Brussels Sprouts
Start by removing your Brussels sprouts from the stalk (if you’re lucky enough to have one-it keeps them extra fresh). Trim the stem ends just slightly. Don’t overdo it, or the leaves will fall apart during cooking. Slice each sprout in half lengthwise. This exposes more surface area for maximum caramelization.
Pro Tip: Leave a little of the base intact to hold each sprout together while it crisps.
2. Preheat Your Cast-Iron Pan
Place your skillet over medium-high heat and give it a minute to get hot-really hot. You’ll know it’s ready when you see faint wisps of smoke rising from the surface. This is crucial for achieving that steak-like sear.
Add 2 tablespoons of ghee to the pan. Ghee not only has a high smoke point but also adds a rich, buttery flavor that takes these sprouts over the top. Swirl the ghee around so the entire surface is coated.
Bonus Flavor Tip: Ghee gives off a nutty, movie-theater popcorn aroma that’s completely addictive-but without any of the artificial junk.
3. Sear Cut-Side Down, No Touching!
Place your halved Brussels sprouts cut-side down into the pan. Don’t overcrowd-space them out so they can properly sear. And here’s the key: don’t touch them.
Let them cook undisturbed for about 5 minutes. This allows the surface to caramelize and develop that golden-brown crust you’re after.
If you hear sizzling and see a little splatter, that’s a good sign. Use a splatter guard if needed-Brussels sprouts naturally release some water.
4. Flip, Season & Finish Cooking
Once the cut sides are deeply golden and crisp (peek at one to check), flip each sprout using tongs or tweezers.
Now is the time to season. Sprinkle over a generous pinch of kosher salt and a few turns of black pepper. Let them cook for another 4–5 minutes on the back side.
They should be nicely browned all around, slightly blistered, but still fork-tender in the center.
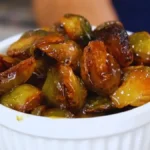
5. Plate & Garnish
Remove from the heat and carefully transfer the Brussels sprouts to a bowl. Garnish with a bit of fresh chopped parsley for a burst of color and a touch of herbaceous freshness.
Flavor Snapshot: Crispy exterior. Creamy interior. Buttery, nutty, savory, and slightly smoky. Basically, Brussels sprout magic.
Some Tasty Ways To Customize and Serve This Yard House Crispy Brussels Sprouts
1. With a Juicy Ribeye or Skirt Steak
Trust me-this is the combo that made us fall in love with Brussels sprouts all over again. The sprouts’ crispy, nutty flavor plays perfectly against a juicy, well-seared steak. We once paired it with a simple skirt steak and didn’t even need a sauce. The sprouts were the sauce.
2. Topped with a Fried Egg
This is one of our favorite weeknight hacks. Throw a crispy fried egg right over a bowl of pan-seared Brussels sprouts, maybe with a little hot sauce or chili oil. The runny yolk mixes with the buttery sprouts and-boom-dinner’s done in 10 minutes.
3. Tossed with Shaved Parmesan
Right after they come out of the pan, we like to shower the sprouts with a handful of shaved Parm. The residual heat softens the cheese just enough to make it melty and rich. It’s elegant but still rustic.
4. Mixed with Crispy Bacon Bits
You can’t go wrong here. Bacon and Brussels are best friends, and we sometimes crisp up a few slices in the same skillet before adding the sprouts-then just toss them together at the end. Salty, smoky, and totally addictive.
5. With Dried Cranberries and Toasted Nuts
We started doing this around the holidays, and it stuck. A handful of unsweetened dried cranberries and toasted walnuts or pecans adds the perfect sweet crunch. It turns the dish into something worthy of your Thanksgiving table-or a cozy Sunday dinner.
6. Over Creamy Polenta
This is pure comfort food. We once layered the crispy sprouts over creamy polenta (with a splash of parmesan stirred in), and it felt like something off a fancy bistro menu. Super warm, super filling, and totally unexpected.
7. Inside Tacos with a Spicy Yogurt Sauce
Sounds wild, but hear us out: charred Brussels, thin-sliced radishes, maybe a few pickled onions, and a quick yogurt + sriracha sauce inside a toasted tortilla? It works. We’ve done “Meatless Taco Night” like this and nobody missed the meat.
8. In a Toasted Grilled Cheese
This is a comfort food sleeper hit. Just layer leftover sprouts between slices of sharp cheddar and sourdough, then griddle it like a regular grilled cheese. The caramelized edges sneak in that deep umami bite. Ridiculously good.
9. Finished with Lemon Zest and Fresh Herbs
Sometimes all they need is a fresh, zippy finish. We like grating some lemon zest over the sprouts, tossing in a few fresh thyme or parsley leaves, and maybe a drizzle of good olive oil. It brightens everything up without adding complexity.
10. As a Warm Grain Bowl Topper
We’ve been doing this more lately for meal prep-spoon the sprouts over a bed of farro, quinoa, or brown rice, add some avocado, a soft-boiled egg, and a scoop of hummus or tahini drizzle. It’s filling, healthy-ish, and never boring.
Some Tips on This Yard House Crispy Brussels Sprouts Recipe
1. I always get fresh Brussels sprouts.
The ones still on the stalk? Super fresh! They taste better and stay nice and tight. I just pop them off and get started.
2. I don’t cut off too much of the bottom.
If I trim too much, the leaves fall off. I just snip a little bit to keep them all together.
3. I make sure to cut them in half.
When I slice them down the middle, the flat side gets golden and crispy. That’s the best part!
4. I let my pan get really hot.
I wait until I see a little smoke before I add the sprouts. That’s how I know it’s ready to sizzle.
5. I use ghee-it smells amazing.
Ghee is like butter, but better. It makes the sprouts taste rich and yummy, and it doesn’t burn fast.
6. I always place them cut-side down.
That’s the secret to getting that deep, golden crust. I don’t move them around. I let them sit and get crispy.
7. I use a splatter guard.
When they hit the pan, they sometimes pop! The guard keeps me safe and the stove cleaner.
8. I don’t touch them for 5 minutes.
This was hard at first-but now I know that leaving them alone helps make that perfect crispy crust.
9. I season after flipping.
Salt and pepper go on after I flip them once. That way, they don’t draw out too much water while they cook.
10. I like to finish with a little parsley.
A sprinkle of green on top makes it pretty and adds a fresh taste at the end.
How to Store and Reheat Yard House Crispy Brussels Sprouts
Store leftover Brussels sprouts in an airtight container in the fridge for up to 4 days. To reheat, use a hot skillet over medium heat for 3–4 minutes to restore crispiness. Avoid microwaving-they’ll get soggy. For oven reheating, bake at 400°F for 8–10 minutes on a sheet pan to keep them crispy.
[mv_create key=”27″ thumbnail=”https://chilirecipehub.com/wp-content/uploads/2025/05/Yard-House-Crispy-Brussels-Sprouts-Recipe-1.webp” title=”Yard House Crispy Brussels Sprouts Recipe” type=”recipe”]
Common Queries on This Yard House Crispy Brussels Sprouts Recipe
Here, we’ve got you covered with some common questions about the Yard House Crispy Brussels Sprouts that people often ask.
1. How do you get Brussels sprouts really crispy?
From our experience, the key is high heat and not crowding the pan. Whether you’re roasting or pan-searing, give each sprout room to breathe so it can caramelize, not steam. For the pan method, use a cast-iron skillet preheated until it’s just starting to smoke, and make sure you place the sprouts cut-side down in hot fat-ghee is our favorite.
2. Why won’t my Brussels sprouts get crispy?
In our early attempts, the sprouts came out soft, and here’s why: too much moisture and not enough heat. If your pan isn’t hot enough or the sprouts are wet (from washing or overcrowding), they’ll steam instead of sear. Pat them dry and preheat that pan longer than you think-don’t rush it.
3. What’s the secret ingredient for the best roasted Brussels sprouts?
Hands down: ghee. It’s got a high smoke point like oil but brings a rich, nutty, buttery flavor that takes things to the next level. It makes your kitchen smell like roasted heaven and gives you that golden, crispy edge every time. Avocado oil is great too, but ghee has our heart.
4. Should I boil my Brussels sprouts before frying?
We tried that early on and found it made things worse-boiling adds moisture, which is your enemy when trying to crisp. Skip the boil. Just trim, halve, dry, and sear. Trust us, you won’t miss the soggy step.
5. Can I use frozen Brussels sprouts for this Yard House Crispy Brussels Sprouts Recipe?
We’ve tested it, and while frozen sprouts can work in a pinch, fresh ones give the best texture and flavor. Frozen sprouts tend to release more water and don’t sear as well. If using frozen, make sure they’re thawed and very dry before cooking.
6. What type of pan works best for pan-searing Brussels sprouts?
We’re big fans of cast-iron skillets. They hold heat like a champ and give you that deep caramelization you just can’t get with lighter pans. If you don’t have one, a heavy-bottomed nonstick will work, but the crisp factor won’t be quite the same.
7. How long should I cook them on each side?
From our tests, about 5 minutes cut-side down, undisturbed, followed by 4–5 minutes on the other side is the sweet spot. Don’t flip too early-wait for that golden crust to form.
8. Do I need to season the Brussels sprouts before putting them in the pan?
Actually, no-we don’t! We’ve found it’s better to sear first, then season. Salt draws out moisture, which can interfere with browning. So let them crisp up in the pan, then sprinkle salt and pepper after flipping. The flavor sticks better, and you avoid steaming.
9. How do I know when my Yard House Crispy Brussels Sprouts are done?
Visually, you’re looking for a deep golden-brown crust on the cut sides, with slightly blistered outer leaves. Inside, they should be fork-tender but not mushy. If you see color and smell that nutty, roasted aroma-you’re golden.
10. Can I add extra toppings or flavors?
Absolutely-we love experimenting. After cooking, toss them with a little lemon zest, toasted walnuts, or dried cranberries for contrast. A drizzle of balsamic glaze or a sprinkle of Parmesan adds another layer of flavor too. Just make sure to let the sprouts shine as the crispy star of the dish!
Feel free to share your experience with this recipe by trying it out. Don’t forget to drop a comment and provide your feedback on the blog for us to read.

2 Comments
Leave a Reply
You must be logged in to post a comment.


[…] We’ve tried it on fries-both regular and sweet potato-and it’s incredible. Pour it over loaded Crispy Brussels Sprouts with cheese, bacon bits, and green onions for an easy, crowd-pleasing snack or side […]
[…] for a Meatless Meal On lighter days, we plate these potatoes with grilled zucchini, mushrooms, Crispy Brussels Sprouts, and cherry tomatoes. The mash adds that satisfying creaminess to an otherwise fresh, wholesome […]